Archives

The Regency Horse World

Hunter. Carriage horse. Race horse. Town hack. Horses were part of everyday life in Regency England. And the horse world of a few hundred years ago was quite different than its modern counterpart.

RACING


By the start of the 1800’s one of the biggest innovations in horses had already occurred—the Thoroughbred had arrived. Three founding stallions—the Darley Arabian “Manak,” the Godolphin Barb, and the Byerley Turk—had been brought to England in the early 1700’s. When the light, fast and sturdy Arabians were bred with the larger, cold-blooded English mares, the cross produced a horse with size, speed and stamina. It produced the Thoroughbred.

At the same time that the Thoroughbred was being established as a breed, horse racing was also becoming a regulated sport. In 1711, Queen Anne had established regular race meetings at her park at Ascot. Gentlemen organized races for themselves, often “matching” particular horses against each other, and by 1727 a Racing Almanac began to be printed.

Flat and jumping races were also held for women only. Mrs. Bateman wrote in 1723, “Last week, Mrs. Aslibie arranged a flat race for women, and nine of that sex, mounted astride and dressed in short pants, jackets and jockey caps participated. They were striking to see, and there was a great crowd to watch them. The race was a very lively one; but I hold it indecent entertainment.” Some women—such as the infamous Letty Lade, who apparently swore like a coachman—rode and drove to please themselves, but they were the exception in the Regency world.

Around 1750, the gentlemen who regularly met at the Red Lion Inn at Newmarket started the Jockey Club. And in May of 1779, the first Derby was held. By 1791, the Jockey Club had issued the “General Stud Book”, and by the early 1800’s Jockey Club stewards attended every racing meet.

Assize-week was the time for races, for that was when the gentry came into the chief town of the shire for trials and selling harvest. Meet sprang up, and still run, at Newmarket in April and October, York in May, Epsom, Ascot in June, Goodwood, Doncaster, Warwick, Manchester, Liverpool, Chester, Cheltenham, Bath, Worcester, and Newcastle.

Racing, however, was a sport for the rich. Before the Prince Regent quit the racing scene in 1807, his racing stud farm came to cost him 30,000 pounds a year.

FOX HUNTING

For the less wealth, horses still served as sport, primarily for fox hunting. While Thoroughbreds might be seen in the field, one might also see farmers upon their heavier draft horses, such as the Suffolk Punch. Children might well be mounted upon the small but handy Welsh Cob or Welsh pony. And Irish Hunters, with their thick bones and size have always been prized for horses who can go all day and then some.

While fox hunting traces its roots back to the mid-1600’s, the sport did not take its present form of jumping and long runs until after the Enclosure Acts of the 1700’s. By the 1780’s, fox hunting had become the most popular of sports, replacing the more ancient sport of stag hunting.

November to March was, and remains, fox hunting season, starting after the fall of the leaf, when the fields lie fallow, and ending after the last frost, just before the first planting.

Hunt territories varied widely. The fifth Earl of Berkeley hunted an area from Berkeley Castle to Berkeley Square, stretching 120 miles.

By 1810, there were 24 subscription packs—a packs that one could pay to hunt with, as opposed to requiring an invitation from the Master. This would double, so that by the mid-1800s hunting had become more a matter of ‘subscribing’ in exchange for the right to hunt with the pack.

The golden age for hunting in Leicestershire is considered to be 1810 to 1830. During this time, there were as many as 300 hunters stabled in Melton Mowbray—with some gentlemen keeping up to 12 hunters. A gentleman could hunt six days a week with the Quorn, the Cottesmore, the Belvoir, and the Pytchley.

Ladies were also found in the field. Mrs. Tuner Farley hunted for 50 years. Lady Salisbury was master of the Hatfield Hunt from 1775 to 1819. She hunted old and blind, in her sky blue habit, with a groom leading her horse and yelling at her to, “Jump, damn you, my lady.” And from 1788 to 1840, Lord Darlington hunted his own hounds four days a week in Yorkshire and Durham, with his three daughters and his second wife, all in their scarlet habits.

However, between late 1700’s to about mid 1800s, when the jumping pommel was invented for the side saddle, ladies were more likely to be advised to “ride to the meet and home again to work up an appetite.”

While fox hunting was viewed as a sport for everyone, the reality was that it cost money to keep a pack of hounds and hunt them. However, anyone could take a horse and follow, if the master allowed it, and some followed the hunt in their carriages.

CARRIAGES
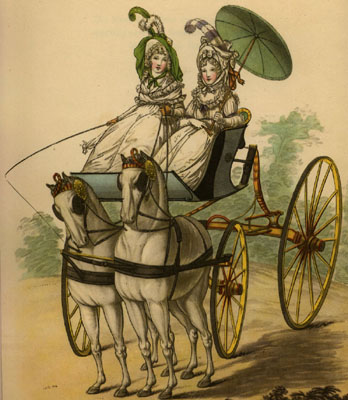
For most families, a carriage was a necessity, and specific breeds of horses were used in harness. The ideal hunter had a long, low stride. But a carriage horse needed high-stepping action, which looks lovely in harness, but which is not always the most comfortable ride.

Carriage breeds of the era included the Yorkshire Trotter, the Norfolk Trotter, the Hackney Horse, the Hackney Pony, and the Cleveland Bay, which is still one of the most desired of carriage horses. Ponies were often used for smaller vehicles, and for ladies. Prints of the era often show ladies driving a matched team of cream ponies–which looks a lovely sight.

Owning and maintaining a horse could be expensive, but there were more affordable options.

John Tilbury of Mount Street in London offered a horse for rent at 12 guineas a month. For 40 guineas, one could hire two hunters and a servant.

Carriages were more expensive than horses, for they had to be custom built. Families with modest incomes would often purchase a carriage second hand, from an advertisement in The London Times. Those who could afford it would have a carriage built to their own specifications.

In Jane Austin’s Northanger Abbey, Mr. Thorpe enthuses over his new carriage, boasting: ‘Curricle-hung, you see; seat, trunk, sword-case, splashing-board, lamps, silver moulding, all you see complete; the iron work as good as new or better’ — and all for fifty guineas.

Chandros Leigh, a distant cousin of Jane Austen, obtained an estimate for a fashionable laundau in 1829. The price of the basic carriage was 250 pounds, which included: ‘plate glass and mahogany shutters to the lights, and plated or brass bead to the leather, lined with best second cloth, cloth squabs, and worsted lace….’ The ‘extras’ ordered including footman’s cushions, morocco sleeping cushions, steps, silk spring curtains, his crest on the door, embossed door handles and full plated lamps. These brought the cost to 417 pounds, 11 shillings and 6 pence, but he was given 60 pounds in exchange for his old carriage.

Carriages for country and for town were generally quite different in build, for they served different purposes. And since carriages were custom built, almost every carriage could be a unique design. Common types of carriages, however, included:

The Phaeton – a four-wheeled, owner-driven vehicle fitted with forward facing seats, usually an open carriage.

The Gig – a two-wheeled vehicles (Whiskey), built to hold two, usually an open carriage.

The Curricle – the “gig” of the quality, built to hold two, which could be two or four-wheels, and which sometimes had a top that could fold down.

A Town Coach – a closed coach that could be drawn by one horse or a pair.

Landau – a four-wheeled vehicle that held four, which was drawn by a pair and built with a removable or folding top.

Barouche – a four-wheeled vehicle drawn by a pair, or by four or even six horses, with an option for a driver, or for post boys to ride and control the horses. Sometimes built with a fold-down top.

(For images, visit –Georgian Times.)

A ‘Drag’ was a slang term for a gentleman’s private coach. It was built much like a mail coach, and often used for race meetings or other outdoor events as it height and roof seats created its own grandstand.

In 1805, smaller Hackney coaches came into use and in 1823 the first Hackney cabs came to London. It was not until 1830’s, however, that the famous Hansom Cabs appeared in London.

Both carriage and road constructions were being developed during the Regency and were not without problems.

Sylas Neville’s diary recorded a 1771 journey on the London to Newcastle stage. It took him two days, traveling day and night, to cover the 197 miles from Stilton to Newcastle.

By the 1780’s, private carriages could cover the distance from Bath to London in 16 to 18 hours. But the Royal Mail coaches were much slower until John Palmer produced a mail coach that left the Rummer Tavern in Bath on August 2, 1784 at four PM, and arrived at the Swan with Two Necks in London by eight AM the next morning. The stage had traveled 119 miles in less than 16 hours!

Up to 1820, most coach horses were changed every ten to eleven miles. Thereafter, to get better speeds, they opted for even less distances, changing about every six miles. But as Mr. Darcy says in Pride and Prejudice, “fifty miles of good road was ‘little more than half a day’s journey.’

With so many road problems, those who wished for speed would often ride.

RIDING: SIDE SADDLE AND ASTRIDE
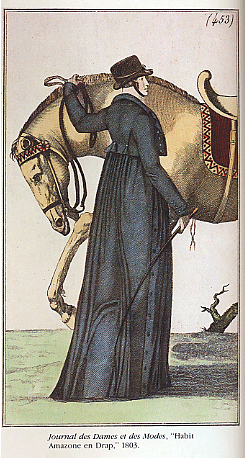
Riders of the 1800’s leaned back and rode with long stirrups that kept their seat in the saddle. Even jockeys rode sitting down square on a horse’s back. And English ‘tack’ or equipment is quite different from its ‘western’ counterpart.

An English saddle has a pommel up front, not a saddle horn. The back of the saddle is the cantle. The saddle is held in place with a girth–not a cinch–and uses stirrup leathers and stirrup irons.

Riders generally carry a hunting whip, which is designed with a crook on the end to open gates, and whip points on the opposite end that can be changed and used to control the hounds. This whip is not actually used to whip the horse.

A lady often used a whip to give a light tap to the horse on the ‘off’ or right side as a command, since her legs hang down on the ‘near’ or left side.

Prior to 1835, a side saddle had only one or two pommels. One turned up to support the right leg, and some had a second pommel which turned down over the left leg. The ‘jumping’ pommel did not exist in Regency times.

A lady’s riding habit had to be cut so that it draped down over the horse’s side, coving ankle and boot in a lovely flow. This drape required that a loop be attached to the hem, so that, when dismounted, a lady could gather up the extra length of skirt. The fabric for a habit was usually a heavy cotton, twill or wool. And due to its cut, a habit can provides any woman with a long stride as much freedom as breeches.

Riding habit styles often copied military fashion, with close cut coats, cravats, and military shakos. Ladies always wore gloves, both to preserve their hands, and to improve their grip upon the reins.

One print from the early 1800 shows a lady strapped into her saddle, but the danger from this would be that if the horse fell the rider would almost certainly be crushed or dragged.

Modern views make it seem as if riding side saddle must be awkward and uncomfortable. In fact, it is neither.

The important factor in riding side saddle is the horse. A comfortable stride and good manners are essential. This does not have to be a placid horse, but should not be a horse with a rough or bumpy stride.

The side saddle requires the rider to sit with a straight back and with hips and shoulders absolutely even. Slightly more weight should be carried on the right hip to compensate for the weight of both legs on the left. Any tilting to one side, leaning or twisting eventually results in a horse with a sore back.

Side saddles have a broad, flat and comfortably padded seat. The right leg goes over a padded leather branch which turns up (the top pommel). The left leg is in a stirrup that is short enough to bring it firmly up against a second pommel which turns down. If the horse plays up at all, the rider must clamp both legs together, gripping these pommels.

On a comfortable horse, riding side saddle soon begins to feel a bit like riding a padded rocking chair. It’s far less tiring than riding astride for the only effort is to sit straight and still.

While it is possible to rise to the trot in a “posting” motion, some claim that this is the real cause of giving a side saddle horse a sore back as it requires too much weight be put in the left stirrup.

Betty Skelton, author of Side Saddle Riding, found that….”As a teenager in the 1920’s, side saddle riding was second nature to me. I found it comfortable and I did not fall off as often as I had done from a cross saddle.” In teaching side saddle, Ms. Skelton has found that a beginner rider can often be comfortably cantering during her first lesson, which is far more progress than most can manage when riding astride.

It is possible for a lady to mound dismount on her own when riding side saddle.

To mount, she holds the reins and whip in the left hand and stands facing the horse, or even slightly towards the horse’s head. Taking the stirrup iron in her right hand to hold it steady, she places her left foot in the iron. With her foot in the iron, she can reach up to grip the saddle. As she hops up, her weight goes to the left foot in the iron and she leverages her weight up.

Instead of swinging her leg over the horse, she pulls her right leg up in front of her and seats herself sideways in the saddle. She then can settle herself with the right leg over the top pommel, the left under the left pommel and in the stirrup.

To dismount, a lady unhooks her right leg, takes her left foot out of the stirrup and simply slides off.

For a gentleman’s saddle, mounting also requires the reins and whip to be held in the left hand. A rider traditionally mounts from the left. The rider stands at the horse’s shoulder, facing the horse’s hind quarters.

With the right hand, the rider turns the stirrup iron sideways. The left foot goes into the stirrup, and the rider may grasp the cantle or back of the saddle with the right hand. He then pushes himself off the ground with the right foot, transfers his weight to the left, stirrup foot, and swings the right leg over the horse’s back to land lightly in the seat.

To dismount, the gentleman kicks his feet out of both stirrups and swings off to the left, the right leg coming over the horse’s back.

By natural inclination, a horse will move out of the way of any rider attempting to leap onto its back with a vault from the rear or a jump from a high point. However, horse may be trained to put up with this behavior.

A groom who leads a horse out for a gentleman or lady will stay and hold the horse’s head. If the gentleman is portly, the groom may also hold the stirrup on the opposite side from the rider to keep the saddle from ending up under the horse’s belly.

In giving a “leg up” to a lady, a groom would not dare to be so bold as to take a lady by the waist, as a rather forward gentleman might. Instead, the groom makes a stirrup from his hands. He then holds his hands low enough to allow the lady to easily step into them with her left foot. Then the groom boosts her lightly into the saddle.

When a groom is unavailable, a mounting block can help, and is particularly recommended to help keep a side saddle even on the horse’s back. This can be a block about two feet in height, or a fallen tree or river bank can serve the same purpose.

In general, horses prefer one horse, one rider. Being creatures of habit, carriage horses also prefer to be driven, not ridden, unless they have been trained for both.

However, with a man’s saddle, it is quite easy to manage two on a horse. The disadvantage is that the lady usually ends up sitting on the pommel, and galloping in this position can be painful on the posterior. For fast flight, it would be best to have the lady sit behind the gentleman and have him hold on to him.

FASHIONS

With all riding and driving, specific fashions evolved in the Regency to denote affiliations.

Each Hunt had its own hunting “colors,” which included a color of coat collar as well as a button insignia. The most fashionable gentlemen in the field might also wear white boot tops to their riding boots. Ladies, too, would wear hunt colors.

The exact origin of the bright red hunting coat—which is actually called a hunting pink—is a little vague, but one theory holds that it was army officers hunting in their scarlet regimentals that started that fashion. Another holds that the tailor Mr. Pink started the fashion, and that the coats took their name from him.

Driving clubs, such as the Four Horse Club or the Four-in-Hand Club, also had specific styles of dress that denoted membership. This included a blue coat with insignia buttons, a yellow and blue stripped waistcoat, a white muslin cravat spotted with black, and white corduroy breeches.

And in the stylish Regency, fashion extended to more than just clothing, for horses and carriages were ways to express ability, style and good Ton.

According to Captain Gronow in his Reminisces, Lord Barrymore drove, “…four splendid greys, unmatched in symmetry, action and power.” While Lord Petersham’s carriages, “…were entirely brown, with brown horses and harness.” Gronow accredits Petersham’s affectation as being due to his love for a widow named Mrs. Brown. Regardless, the color soon became his trademark signature.

Through it all, the horse endured as a symbol of style, as a sport, and as a source of pleasure and delight.

For further reading:

  • Horses and Horsemanship though The Ages, Luigi Gianoli
  • Royalty on Horseback, Judith Campbell
  • Side Saddle Riding, Betty Skelton

Managing POV

Years ago, I was lucky enough to have Jo Beverley judge one of my manuscripts in a contest. Her one comment stuck with me–learn to control viewpoint and you’ll sell. She was right. Now, I’d already tightened up a lot of other craft technique, but viewpoint was a place where I went a bit fuzzy. I wasn’t even aware how much it slipped, but it made me take a really hard look at viewpoint—and to start practicing the habit of only changing viewpoint when I absolutely needed to be in someone else’s POV. This let me cut a lot of the deadwood out of my stories, making them tighter and stronger.

Since then, I’ve since seen a lot of the same old habit I had in contests entries. It’s like something most writers have to go through. And I’ve noticed that viewpoint control actually impacts a whole bunch of other things.

Tighter viewpoint control picks up the pacing. It forces you to show more and tell less (you can’t keep slipping in and out of omniscient POV). Tight control improves characterization, brings in more emotion, and you get a much better story. The reader also tends to be less confused, and becomes more engaged by the character—spending time with anyone (even a character) is a good way to get to know and like that person.

Yet, this is a place where a lot of folks seem to want to be a little loosey-goosey. Folks will say, “But I like to switch POV.” And, yes, switching is fine, but if you’re not doing it for a reason, you may be killing the best parts of your scene. This is where a little more discipline and a little less seat of the pants can help.

And first person viewpoint can help a writer lean a lot. I’ve written a lot of stories in first person, and I still use this technique for scenes that are giving me trouble. Don’t get me wrong, I love third person, but first person is a great way to learn more control. It’s also sometimes the best way to tell a story. But watch using several first persons in a story, that can be tiresome and confusing to a reader unless there are large chunks of time with each character.

With the contest entries I read, I also sometimes get the feeling that some writers may not be aware of what are the viewpoint options. And how do they tighten their control of these.  Managing POV is an important technique to learn, and master.

Viewpoint control is like any other writing technique.  It’s one you have to think about, study, and practice. Once you get really good at it, you can put it in your hip pocket and forget about it—until it comes time to edit and fix problems. And then you need to get back to basics.

I’m doing a workshop on Managing Viewpoint with Savvy Authors this month. Hopefully, this will help folks pick up a few more tips and techniques to bring out the best in their scenes, stories, and characters.  There are techniques that can help you smooth viewpoint transitions. And there are exercises that will strengthen your control of viewpoint.

Even with first person POV, there are ways to improve your control—you can still slip into omniscient from first person if you’re not careful.

And I’m hoping the workshop will remind me, too, of the basics that I always have to keep in mind to tell a good story.

Writing Workshops – How to ?

A friend recently asked about how to do online writing workshops.  So it seemed a good idea to put down what I’ve learned from teaching writing for about ten years now online.

Writing workshop

I’ve taught both workshop classes and online workshops, and there are some big differences. In person workshops give everyone a lot more interaction—you get to see the faces of the people in the workshop, so you can see if there are blank stares, or if folks are getting it. And those taking the workshop can direct some of the information with immediate questions.

This is not to say you can’t ask questions in an online workshop, but so often the question you send in an email or post to the workshop group might not actually be the question you need answered. Communication is an art. But that’s one of the advantages of online—you have to write down your questions, and your assignments.

I’m a big believer in assignments, or exercises. I like the interaction it spawns—when you’re teaching, you get to see if folks are really getting the information, or not. And there’s nothing like practical application to stretch your writing skills.

I also think it’s great to try new things—I like to do that with my own writing skills, just to keep them sharp, and to make sure I keep learning.

Which is a big part of teaching workshops—everyone learns, the instructor included, in a great workshop. There’s an exchange of ideas, approaches, and information. To me, a bad workshop—either online or in person—is one where that exchange, for whatever reason, doesn’t happen.  If students don’t put in, or give back, to the workshop, the whole thing becomes a dull experience—for everyone.

This means the best online workshops have a mix of participants—a few who ask tons of questions, do every exercise several times, and basically throw themselves into it, a few who do some of the assignements, but basically absorb the information, and then a few who lurk, pulling in the bits of information they need.  In person, you often have this same mix, but online, it’s somehow stands out more.

As to structure, the beauty of online is the flexibility. With an in-person workshop, there’s always the limitation of distance and time—the workshop has to be close enough to get to, and it can only last for as long as the room is available. While online workshops always have some time element to them—as in they might last a week, or two, or even a month—that’s more than enough time to cover the subject matter and allow for lots of participation. Time is extended, and since the room is a virtual one, there’s no worrying about ‘driving’ to get to the workshop—or about being late. That’s a luxury for me, too, since I can logon at any time to see questions, post a lecture, or add notes.

I’m also now developing books to go with the workshops—one of the things I’ve found is that folks want to keep and refer back to the material, and with ebooks becoming so popular, it’s going to be easy enough to have ebooks with the material available for those who would like them.  I know I’ve several writing books on my shelves and I refer back to them when I need a refresher course back—that’s what the books will do, and they’ll be a logical extension of the course.

The one thing I’m always trying to get write, too, is the amount of information taught. It’s great to have a workshop with lots of great info, but I’ve taken ones where the information is just too much—I can’t absorb it. Too little information and I start to wonder what I’m doing in that workshop. But the balance is a tricky issue in that what’s too much for one person might be just right for the next. And there’s always the experience issue.

When I taught horseback riding, you’d find great teachers who had gone past the ability to teach beginners. They no longer had the patience for beginners—and they also had been doing this for so long that what seemed obvious to them wasn’t obvious.  The level of experience a writer has can be a big impact in any class—online or in person.  A workshop has to be able to bring the least experienced writer forward with the class—but it cannot drag so much that the most experienced writer is bored. That’s a difficult task.

A range of information can help with this—as can good explanations that more experienced writers can skip past but which will help the less experienced writer keep up.

But I’m always looking for ways to improve the workshops I give—I’ve several set up for the rest of this year, and some already booked for next year, too.

So what do you like most in the workshops you’ve taken online? And what could you live without?

Workshops – Teaching and Taking

I’ve been teaching online workshops now for a few years, and I’ve one coming up for the Show and Tell: An Interactive Workshop course with the Lowcountry Romance Writers, and every one of these is a different beast from the others. There are advantages to online workshops, the best being that you don’t have to drive, and with winter still hanging around, that’s a huge plus. But the other big plus is that, for writing, it’s all about the writing and getting the words down and communicating. That’s a challenge with just text, and so it’s why I’m always adjusting these workshops, and adding new things I’ve learned from my own writing.

Up, up and awayThere are times I feel a lot like a balloon — filled with hot air and not much else, something worth a glance. But the view is always better from up in the balloon. And while maybe I’ve covered the same material before, it only takes one questions that puts everything into a new light and makes it all fresh again.

I’m also a believer in covering the basics over and over again — you do the same thing in dance, you drill. It’s the repetition that actually leads to strong technical skills. That’s true for writing too — you really cannot cover the basics enough.

But all this leads me to think about what someone should expect from an online workshop — what is it possible to get and what is it possible to give. And since I’ve taken a few courses I have opinions about both sides of workshops.

The first job of any teacher is to engage. This means workshops shouldn’t bore. This one can be tricky online because you’re trying to balance conveying a lot of great information with trying not to overload the workshop participants — and everyone has different levels of processing. “The mind can’t absorb what the butt can’t endure” — in a classroom, you can only keeps folks sitting for so long unless you are utterly fascinating. Online that changes. Some folks read faster and some don’t; some folks retain more from what they read, some don’t. So there has to be a fair bit of repeating, balanced with the new information.

And sometimes it just takes saying the same thing several times to make it click. Short sentences help. A lot.

The second job is to inform — and my own criteria is if I get one gem, one golden nugget out of any workshop, it’s worth the price of admission. (And, yes, I’ve had a few workshops where that was missing, but almost every workshop will give you one good bit of advice — everything after that is gravy.)

With the entertaining, and the information snuck in, that covers the basic for any workshop for me. But I do think the best workshops have one more vital element — they’re fully interactive. Teaching has to be a dialogue.

I’ve lurked in workshops and I’ve participated — I always get more from the ones where I dive in and try out new things. I have more fun if I get my hands dirty. And workshops should be a place to fool around and try new things.

I also like teaching workshops more when those taking the workshop are willing to play — give and take is always more fun that either just giving, or just taking.

Which, actually, leads us back to the “show and tell” workshop — fancy that — because stories that both show and tell are also more fun that stories that just show or just tell. It’s all about balance really — in a workshop, or a story. A balance of information and engagement. A balance of give and take. A balance between showing folks how it’s done and telling. And that’s the thing about balance — it’s something that must be maintained. And I think that’s what I’m always looking for in a workshop — a well balanced flow of information.

But what’s your criteria for a great workshop?

Setting up for Digital

Some things just seem simple–digital publication is one of those. Upload a file and presto, right? But there are a few things that you want to figure out first—it’s another case of a little planning going a long way.

ISBNS

The ISBN is an industry standard for identifying a book. If you want full control of your book listing, buy your own ISBNs, which you can do through Bowkers at myidentifiers.com

You can buy a single ISBN for $125, or a premium one for $185, or buy 10 at a time for $250. Assigning them is a bit of a pain.

The ISBN is not actually in use until it is applied to a book. To do this, you’ll need the book cover, your bio, your book description, a PDF of your book, and an Excel file saved in the CSV format with the Search Engine Optimization (SEO) terms you want to use.

After you buy your ISBN, login to myidentifiers.com and follow the tabs and fields to set up all the information. You can also replace an older print ISBN if that print edition has gone out-of-print.

Include pricing and sales areas (countries where you’re selling), and check back in a few days to confirm your ISBN has been activated for that digital publication. It usually takes only a day or two to get this set up.

Then you can do that “easy file upload” for digital publication on Amazon Kindle, B&N Nook, and Smashwords.

Smashwords

Smashwords.com is both easier in some respects, and more difficult in others. They do provide a lot of information readily available on their site. The first step is to sign up and set up an account. Set up payment methods and create a profile. Click on the PUBLISH button to start the publishing process.

Fill out all the forms. Set your price (and Smashwords offers a cool graph to show what you’ll be making on any book for each price point). Be honest about if your book contains adult material (explicit sex or graphic violence). Upload your correctly formatted book and your cover. And remember to include the wording that Smashwords requires at the front of your book.

IMPORANT: Always take a look at the preview to make sure your book appears as you want it formatted. If you need to, adjust the text in the file and upload that again to correct any formatting errors or typos.

With the ISBN manager at Smashwords, you can add your ISBN or let Smashwords give this to you. If you’re having Smashwords do your ISBN, but you’re doing your own Kindle and Pubit uploads, set up Smashwords first so you have the ISBN to add other places.

Before you do that final submit, read the legal stuff (the Terms). This is a contract you’re signing with your mouse click.

It can be minutes to hours to actually have the book upload. It will then show as pending approval (that’s okay).

In Smashwords, select DASHBOARD, and now set your distribution for this book with the Distribution Channel Manager.

You can let Smashwords distribute to all formats, including Kindle and Nook. However, you’ll make higher royalties if you do your own Amazon and BN distribution. For Smashwords, I opt out of Amazon and BN formats. I opt into Apple (which requires an explicit opt in selection).

NOTE: Your book will appear in Smashwords right away, but will not be listed there as “premium content” until it’s approved. Check back every few days to make sure it is approve, or if the format needs to be adjusted (and also to see how you’re sales are doing).

UPDATE TO SMASHWORDS: They now allow both short descriptions, and long descriptions of up to 4000 characters. If you have books on Smashwords, you may want to update your descriptions. I’m using the short descriptions for review promos, and then adding in more details about the story in the long descriptions.

B&N PUBIT

For uploading to the Nook via Pubit, this again starts with reading up on the process on their site, and creating an account, this time at pubit.com. B&N requires a credit card to create an account. This is in case a book is returned (for example, you’ve sold 20 books, but one person decides to send it back, but B&N has already paid you for 20 books; they use the credit card to account for that one return). Some folks don’t like this but I had no issues.

When your account is set up, head to Add a Title.

One nice thing about PubIt is that you can save your work as you go (very handy that). So you can add some info, go away, fuss with promotional copy, and come back and add that.

As with all other formats, once you upload your book, make sure you check out how it will look with the preview option (PubIt automatically brings this up for you to view, which is a nice feature). You can also mark if the book is part of a series.

You can add up to five reviews, including reviewer names and quotes. You can post excerpts from the reviews, but you should get clearance from the reviewers before you use their copywritten work.

NOTE: While BN’s PubIt doesn’t require you to have an ISBN, I’ve found it’s easier to add this up front, instead of trying to update the ISBN at a later time. Everything else is much easier to update (cover, copy, reviews, descriptions, even pricing).

Amazon Digital Text Platform- Kindle

UPDATE: Amazon has renamed this to the “Kindle Direct Publishing”. They’re also now putting out a newsletter with useful tips and advice. The old link below still works, but the new link is: https://kdp.amazon.com.

The options at Amazon can be confusing: they have Create Space, and Kindle, and their Associates Program. To actually sell a book on Kindle, you want to head to: https://dtp.amazon.com. If you don’t have an existing Amazon account, you can create it. Again, Amazon provides a lot of information about the process on their site (including a video). The details can be a little overwhelming, so you may want to tackle the basics first, and then improve your publishing and promoion.

NOTE: To help promote your book you’re also going to want an Author’s page at https://authorcentral.amazon.com.

As with PubIt and Smashwords, you’ll need to set up all your account information so you can get paid.

Again, you enter your book title, cover, and upload your book. Make sure you spell your name as the author correctly. Again, make sure you preview how the book looks on Kindle.

You can mark if this is a series (same as for PubIt). You can set your pricing and opt out of DRM. Add in your ISBN if you have one. When you save your information, the book will go into a pending mode. Once approved, the book will be listed for sale.

And there you have it – the easy (or almost) steps to digital publishing.

Twelve Steps to a Digital Format

There’s lots of information out there about eBook format. But in converting my print books, I’ve streamlined this to a simple twelve steps. You can get fancier if you know what you’re doing. My choice is go to for a clean format. So, here’s the twelve easy steps.

Twelve Steps to a Digital Format

STEP 1 – Put your book into a single file in Microsoft Word. I had my chapters split into multiple files, so the first step was a lot of cut and paste. I did have electronic versions of my work, but not the same ones as in print. This meant either scanning the books or manually inputting my edits. I went with the latter and made this part of my editing process.

Other ways you can do this might include a search the Internet to see if someone’s done the work for you and you can grab an electronic version (yes, those pirate sites have a use). You can invest in a scanner and OCR software that converts the scanned image into text—the cost will be about $300 – $400 for a full setup. Or you can pay for a print book to electronic conversion: about two to three dollars a page to get all the work done for you. If you’re still going it on your own….

STEP 2 – With your book file open, use the SELECT function. Select ALL and set the font to Ariel or Times Roman. Electronic readers like consistency and these are about the most Web-safe fonts around. I use Times Roman for the bulk of the book, but I put the title and front copy into Ariel.

STEP 3 – Set the font to 12 or 14 point, no smaller and no larger.  I like to set the title and chapter headings to 14 point and use 12 point for everything else.

STEP 4 – Remove all TAB marks. To do this, use the REPLACE function, select MORE and SPECIAL CHARACTERS. Put the tab mark in the field to “find” and nothing in the replace area and that will remove them all.

STEP 5 – Use the REPLACE function to search and replace all double spaces with single spaces (do this a couple of times to catch all of them).

STEP 6 – Set your paragraph indents with the PARAGRAPH function. Set INDENTATION to SPECIAL, FIRST LINE, with LEFT set to .2″ or .3″ (you can go up to .5″ but I think the smaller option looks better in the electronic readers).

STEP 7 – Use the PARAGRAPH function to set spacing to single space.

STEP 8 – Remove all headers and footers—deleted them.

SEPT 9 – Remove any page breaks between chapters.

STEP 10 – Center your chapter headings and number chapters as in “Chapter One” – that’ll help to automatically generate a table of contents. Put only a single blank line space between chapter headings and the text – that’s both before and after.

STEP 11 – For breaks within a chapter, use a simple mark such as the asterisk (*) which electronic readers can handle.  Center this and put a single blank line space before and after.

STEP 12 – Put dedications and reviews up front since this is free preview content.

Your format should look something like this (without the blue text which is just here to make the book text stand out)…

Opening Page:

A PROPER MISTRESS

Shannon Donnelly

For Marsha —
may you always find the courage to choose happiness

Bookseller’s Best Finalist, Golden Quill Finalist, Orange Rose Finalist

“With its excellent characterization, polished prose, and humor, Donnelly’s latest Regency is a supremely satisfying, deftly plotted delight.” – Booklist, American Library Association, John Charles

“…delightfully offbeat romp with an engaging set of young lovers and a good cast of supporting players…highly enjoyable” — Romantic Times Top Pick – 4½ Stars

“I highly recommend A PROPER MISTRESS, and can’t wait for Ms. Donnelly’s next book….” — Five Roses – Escape To Romance, Marlene Breakfield


CHAPTER ONE

“Beauty ain’t required, but she’s got to catch the eye,” Theodore Winslow said, striding across the small salon, one hand fisted behind his back and the other gesturing in the air. “I mean, I’m supposed to be smitten. But she can’t be at all acceptable—only she can’t be too coarse, either,


A chapter break will look similar to this:

“Why, you’re hardly more than a boy yourself! Why ever do you want to go hiring a woman from this house to act as your bride?”

CHAPTER TWO

At the sight of a short, curvaceous redhead being thrust into the room, Theo started to smile. But those tempting, full lips parted and her words cut into him like a butcher’s knife. Hardly more than a boy!

And a scene break will look something like this:

“Well, you want to make sure you ain’t a trout with your mouth gapping open to be hooked by this flash gent, or any other. Remember that, or you’ll be agreeing to more than you think you will now. And just you remember, too, every woman may have her price, but every man has his limits. Most of ’em start with his purse. Now, let’s see how those dresses look. You’re going to have to be dazzlin’, ’cause it’s going to take us longer than a quarter hour to turn you out in style.”

#

By the time Sallie finished, Molly no longer recognized herself. Nell and Harriet, seeing the door open to Jane’s forsaken room, had poked their heads in—eyes sleepy and hair tumbled and still in their night wrappers. Sallie’s house kept late hours and late mornings. Sallie bustled them out, saying to Molly afterwards, “Never does to stir up jealousy, and you don’t want them thinking you’re stealing their trade.”

———————-

If you know what you’re doing, you can get fancier about the formatting. Or if you pay someone to do this for you, they can do the fancy stuff.

While this may sound like a lot of work, I found it to be not all that difficult, it just takes some time. I’m averaging two to three weeks to get a book formatted and that’s working only weekends and evenings and doing all the edits. It’s going faster the more I do this (I’m getting a process down). Basically, this requires patience and persistence, something every writer needs in buckets.

Save your file as both a standard word .DOC or .DOCX.  Also save the file as a PDF version (this will allow you to give away free PDF copies to readers, and you’ll need this format, too, if you set up an ISBN).

NOTE: Smashwords also requires specific text at the front of your book about being published at Smashwords, so you want to set up a separate file with this info:

Published by Shannon Donnelly at Smashwords.com

Copyright 2010 Shannon Donnelly

Discover other works by Shannon Donnelly at Smashwords.com


That’s it. Twelve steps. The part that really takes the work is getting the writing done in the first place.

English Winter Fare

In the still largely agrarian world of the early 1800’s, autumn and winter became a time to relax after harvest. Gentry and yeoman alike could take advantage of old feasting customs that had long ago mingled with the Christian holidays.

In autumn, Parliament opened again and some of society returned to London. St. Michael’s and All Angel Day, or Michaelmas, at the end of September, marked the end of a quarter year. The Celtic calendar also wove itself into English holidays, with one of the main events on November 1 becoming All Saints Day or All Hallows and October 31 therefore set as All Hallows Eve. It should be noted that Saman (also Samana, Shamhain, and Samhain) a minor Celtic guardian of herds, and so important to a herding society, played a part in the celebrations, but modern lore has turned him into an ancient god of death and mixed up several Celtic customs along with imported Christian beliefs to give us Halloween.

October was a month when land owners ate pheasant, partridge, duck and grouse. Fish for meals included perch, halibut, carp, gudgeons, and shell fish. Poachers also looked to snared hares for their pot. Beans were still fresh, and the fruits of summer gave way to pears, apples, nuts and the last harvest of grapes.

On November 5 bonfires burned in mockery of Guy Fawkes and memory of the Gunpowder Plot to blow up Parliament. The Feast of St. Martin, or Martinmas, fell on November 11, and St. Andrew, the patron saint of Scotland, had his day on November 30. St. Andrew’s day also marked the beginning of Advent to celebrate the four weeks before Christmas. In November, the landed gentry still dined on wild foul as well as domestic poultry—which was now getting a bit old and aged (meaning tough and needing sauces to make the meat palatable). They also had beef, venison and pork with their meals. Fish could still be caught and served, and winter vegetables graced the dining room, including: carrots, turnips, parsnips, potatoes, leeks, cabbage, celery and lettuces. With November, walnuts and chestnuts came into season.

More celebrations lead to Christmas Eve when the Lord of Misrule danced and the Mummers traveled to perform their pantomimes. Then came Christmas Day, and Boxing Day on December 26, which was St. Stephen’s Day. Boxing Day did not get its name from gift boxes, for the exchange of gifts was a German custom still new to Regency England. Instead, Boxing Day got its name from the older tradition of it being a day in which pleadings could be placed in a box for a judge to privately review. In December, besides beef and mutton to eat, pork and venison were served. Goose was cooked for more than just the Christmas meal, and there would be turkey, pigeons, chicken, snipes, woodcock, larks, guinea-foul, widgeons and grouse to eat. Cod, turbot, soul, sturgeon and eels joined the list of fish in season. Forced asparagus added a delicacy to the usual winter vegetables. Stored apples, pears and preserved summer fruit appeared on the better, richer tables. Mince pies made from mincemeat, which has no meat in it, were another traditional fare, with the tradition being that everyone in the household should stir, for luck, the mix of dried fruit and spices before it was baked.

Households also celebrated not just according to the season, but also to the customs of the area. In the Regency, local customs in the countryside might well hold to the old ways.

Under the Kissing BoughFor one of my books, Under the Kissing Bough, I needed a Christmas wedding and customs that suited the countryside around London. In ancient days, a Christmas wedding would have been impossible for the English Church held a “closed season” on marriages from Advent in late November until St. Hilary’s Day in January. The Church of England gave up such a ban during Cromwell’s era, even though the Roman Catholic Church continued its enforcement. Oddly enough a custom I expected to be ancient—that of the bride having “something borrowed, something blue, and a sixpence in her shoe”—turned out to be a Victorian invention.

For Christmas customs, I relied on those that have carried down through the ages: the Yule log from Viking winter solstice celebrations (which gives us Yule Tide celebrations), the ancient Saxon decorations of holy and ivy, and the Celtic use of mistletoe on holy days, which transformed itself into a kissing bough. Carolers might well travel from house to house, offering song in exchange for a wassail bowl—a hot, spiced or mulled drink, another tradition left over from the Norse Vikings.

The holidays were a time of games as well, and the game of Snapdragon is a very old one. It’s played by placing raisins in a broad, shallow bowl, pouring brandy over them and setting the brandy on fire. Players then must show their courage by reaching through the spirit-flames to snatch up raisins. And the game even comes with its own song:

Here comes the flaming bowl,
Don’t he mean to take his toll,
Snip! Snap! Dragon!
Take care you don’t take too much,
Be not greedy in your clutch,
Snip! Snap! Dragon!

Celebrations continued to mix tradition and religion when the Twelfth Night feast arrived on January 5, which combine the Roman Saturnalia with the Feast of the Epiphany, when the three wise men were said to have paid tribute to the Baby Jesus. Deep in winter, there was still plenty of game to eat. Beside those wild and tame birds available in December, lobster came into season in January, as did crayfish, flounder, plaice, smelts, whiting, prawns, oysters and crab. Broccoli made a welcome change from the other winter vegetables, as did cress, herbs, cucumbers, beets and spinach. Preserved fruits would be running low in all but houses with large orchards, and stored apples and pears would have to serve guests until the expensive force strawberries of February appeared.

For the Celtic year, winter ended February 1 with the celebration of Imbolc or Oimelc. This is the time when ewes begin to lamb and lactate for their offspring, and life begins to return. For the ancient Celts, this was the celebration for Brigid (also Brigit, Brighid or Bride), the Light-Bringer, one of the main Celtic goddesses. She was strong enough to survive and be transformed by early Catholics into Saint Bridget, who was celebrated, along with the Virgin Mary, on February 2, Candlemas Day.

Another ancient tradition, this one of law, was to ignore leap year days—February 29 did not exist. This became the day when the world could be out-of-order. Tradition held that St. Bridget complained to St. Patrick about women having to wait so long for proposals, and Patrick answered that women could propose on Leap Day. In Scotland, their tradition added on that any man who declined a proposal in a leap year must pay a fine, which could be anything from a fine silk dress to a kiss given to the disappointed female.

St. David’s Day the Welsh patron saint came on March 1, and tradition held that all good Welshmen should wear a leak—a vegetable readily available from winter fare. March also brought Lent, and in Shropshire and Herefordshire, Simnel Cakes made with saffron were made for the season.

With March 21, the spring officially arrived, but for most of England, it would still be some time before warm weather and spring flowers arrived, and even longer until the return of the lush abundance of summer fruit and foods.

It’s Not Just a Point of View

Let’s start with a disclaimer—I am not a POV purist. I’m probably going to sound like one, but really I’m fine with viewpoint shifts in a story, so long as they work. But I think most folks use the “I’m not a purist” line as an excuse not to master POV technique. And a lot of folks just don’t know why they need strong POV control in a story.

Back before my first book sold, I was lucky enough to get Jo Beverley as a judge in a contest (she writes historical romance and if you have not read her work, go and buy her books—she’s good). She stressed one comment—master your POV and you’ll sell. She was right. Back then, I had something I see a lot from journeyman writers—floating POV.

Floating POV is when the viewpoint is sort of third person and sort of omniscient. It’s sort of in one character, but sort of not. This can show up in first person, too, where it’s sort of first person, but sort of omniscient, so don’t think you’re immune there. However, it is less likely to show up in first person, which is one of the big advantages to using it. The big problem with floating POV is that it leaves the reader floating above and out of the story, too—the reader ends up emotionally detached. It’s weak writing.

Deep POV, the opposite of floating POV, is about reader immersion. And by deep, I mean viewpoint that is locked within a character. This means locked right behind that character’s eyes and within that character’s head and emotions. Deep POV can be locked in first person or third person, but it is locked tight. When you lock POV like this, it’s very tough to shift—both because you as the author start rolling along with the character, and each shift is a place to lose the reader. With deep POV you naturally tend to want to put viewpoint shifts at chapter breaks or major scene shifts instead of putting these viewpoint changes within a scene.

All transitions in a story are slippery places—chapter shifts, scene shifts and viewpoint shifts are the places where a reader can pause, slip out of the story and put the book down. Put enough of shifts into a scene, or too many fast shifting scenes before the reader is deep in a story, and you can see how POV purists end up having a good point—you’re better off being a purist than someone who changes POV so much that it pushes the reader out of the story.

Like any other writing technique, POV control is about mastering the technique. That’s an advantage a POV purist has because that person has nailed this part of the craft. And if you don’t practice a discipline, if you’re always loose with your POV, you won’t learn how to control your story (or the reader’s attention).

Coming from a background where I’ve dabbled in the other arts—music, painting, dance—I’m a believer in solid technique as a foundation. The stronger your technical skills, the more you can let them run on auto-pilot and focus on the fun stuff. When I played violin, every practice started with a half hour of scales. Only then could I dive into the music and have it come out sweet. Scales both limbered up my skills and improved my technique. A writer doesn’t really have the equivalent of musical scales, but we can still practice technique.

To improve my control of POV and my technical skills, I set myself the following disciplines.

First book I sold, I kept to one character’s viewpoint per chapter. This became the technical exercise in the book. If I needed to cover another character’s emotions in a scene, the following chapter could go back a bit in time to do that scene from that character. But I was a POV Nazi for myself and kept to one character’s POV in each chapter. This deepened my characterization and the emotion in the scenes. It gave me the control I needed—but I still have to go back to this practice at times (yes, those skills you don’t practice get rusty).

Next thing was to write more in first person. I still do this. While I like third person for the flexibility it gives of putting the viewpoints of a lot of characters into a story, I’ll still use first person to write a scene. After the scene is written, if the story is all in third person I’ll shift the first person scene into third person. First person helps me get into my characters and also works a lot like those musical scales to keep my technical skills sharp. It also gives me more emotional bang in my scene, and keeps me honest about my viewpoint control (it’s so easy to think you’re doing this well when you’re not—I always say there’s the story in your head, the story on the page, and the story in the reader’s head, and these don’t always match).

The last discipline is to always ask—do I need to shift viewpoint? (Hint: “Because I feel like it” is never a good enough answer.) Viewpoint shifts need to be treated like any other part of the story—they need a lot of good reasons to be in the story, or they need to be left out. That which does not improve a story will detract. If I have three good reasons to need a viewpoint shift—including the best one, which is that another person in the scene now has more emotionally at stake in the scene—only then will I look at crafting a shift.

Granted, sometimes the instinct to shift viewpoints is one you need to listen to. Writer instincts need to be developed and used. But sometimes this is also justification for a lazy habit that you need to pound out of your writing. This is where you have to be able to look at your writing and know that the scene works—it’s giving you the emotion you need, so don’t touch it. Or you have to apply the discipline to rewrite it and keep the reader within the viewpoint of the key character in that scene so the reader gets every ounce of emotion from that scene.

When you have to make a viewpoint transition, you want to use some technique to smooth this (it’s like a baton hand-off in a relay race, and if you fumble this, the reader can trip right out of your story). But that’s the subject for another day, and for the POV workshop that I teach (shameless plug there, but if you don’t take this workshop, at least pick up Orson Scott Card’s book, Characters & Viewpoint to grab some good tips).

I won’t tell you, “Master POV and you’ll sell.” You may have other writing or story issues to address. But I will say that mastering immersive POV—the ability to put your reader into the story and keep the reader there, the ability to control viewpoint so well that it the craft is transparent to the reader—is key to becoming a great storyteller.

At least, that’s my point of view.


(First published as a guest blog at the FFnP RWA Blogspot.)

Writing Resources

I’ve been doing a workshop on research, which led to my digging out some old notes on useful writing books.  This is the short list of the books that have taught me so very much about writing–these are the books I still have on my shelf, the ones I go back to for a refresher course. These books may speak to you, or may not, but if you find one good piece of advice and some entertainment, these will have served you well, too.

Bird by Bird, Anne Lamott — some instructions on writing and life, the perfect inspiration book

The Artist’s Way, Julia Cameron — a workshop on how to unblock any blocks

The Courage to Write, Ralph Keys — one of the best books ever written on writing

A Manual Of Writer’s Tricks, David L. Carroll — a great idea generator

Characters & Viewpoint, Orson Scott Card — How to invent, construct and animate vivid, credible characters and choose the best eyes through which to view the events of your short story or novel

Creating Characters, Dwight Swain — great advice for beginners and for experienced writers

Techniques of the Selling Writer, Dwight Swain — teaches the bones of story structure

Story, Rober McKee — get the CD, or take his workshop, the book is so dense it’s very heavy going, but there’s a tone of great story structure basics here

Write Away: One Novelist’s Approach to Fiction and the Writing Life, Elizabeth George — Fabulous book, but will be more useful for an experienced writer to take her writing to the next step

On Writing, Stephen King — simple clear advice on keeping writing simple, clear and powerful

Self-Editing for Fiction Writers, Renni Browne & Dave King–a book I still keep right beside by desk and these days every writer needs to learn how to edit her work.

How to Write Romances, Phyllis Taylor Pianka — the basics of the genre

The Art of Fiction, John Gardener — wonderful writing about writing

Food Glorious Food

The wonderful thing about food is that it’s as much fun to read about it and write about it as to actually indulge–well, almost as much fun.  And the joy of writing a historical novel is the meals–breakfast, nuncheon, tea (but not High Tea unless you’ve a Victorian setting or a lower class who must make do with this for their dinner), dinner and supper were and still are the main eating occasions in England.

Meals often provide a social structure for life. However, as noted in The Jane Austen Cookbook, “In the late eighteenth century, at the time of Jane Austen’s birth, it was necessary to make the best possible use of the hours of daylight….candles, wood and coal were quite as expensive comparatively speaking as gas, oil and electricity and far more liable to be in short supply or to run out altogether during hard winters.”

What this meant was a different structure to meals.

To start the day, breakfast came around ten o’clock–well after most had risen and started their day.  The Regency morning then went on through the afternoon, with morning calls being paid.  In London, five o’clock was the fashionable ‘morning’ hour to parade.  And so serving a breakfast party might well occur sometime between one and five o’clock in the afternoon.

During morning calls, light refreshments might be taken.  Ladies might have a ‘nuncheon’ but the notion of lunch did not exist.  Also, the lush high tea now served at most swank London hotels actually originated as a working class dinner, and was perfected by the Edwardians into an art form, but was not a Regency meal.

Dinner in the Regency came at three or four o’clock in the country.  In London, the fashionable dined between five and eight, before going out for the evening.

This left room for a supper to be served–as either a supper-tray that might be brought into a country drawing room, or as a buffet that would be served at a ball.  Such a supper would be served around eleven.  Again, in London, this supper could be served as late as nearly dawn.

From the Georgian era to the Regency the method for serving dinner changed.  “…as soon as they walked into the dining-room they saw before them a table already covered with separate dishes of every kind of food…” states The Jane Austen Cookbook.  The idea was that with all courses laid on the table, those dining would choose which dishes to eat, taking from the dishes nearest.  It was polite to offer a dish around.  Food in History notes, “It was a custom that was more than troublesome; it also required a degree of self-assertion.  The shy or ignorant guest limited not only his own menu but also that of everyone else at the table.  Indeed, one young divinity student ruined his future prospects when, invited to dine by an archbishop who was due to examine him in the scriptures, he found before him a dish of ruffs and reeves, wild birds that (although he was too inexperienced to know it) were a rare delicacy.  Out of sheer modesty the clerical tyro confined himself exclusively to the dish before him….”

This style of serving dinner was known as service à la française.  During the Regency this was replaced by service à la russe in which the dishes were set on a sideboard and then handed around by servants.

Maggie Black and Deirdre Le Faye in The Jane Austen Cookbook provide this menu for a meal recorded in Mrs. Philip Lybbe Powys’ diary of some of the dishes she served, as hostess for her brother-in-law the Dean of Canterbury, for Prince William of Gloucester.  Fourteen sat down to a meal in August, 1798, that included:

Salmon
Trout
Soles

Fricandó of Veal
Raised Giblet Pie

Vegetable Pudding

Chickens
Ham

Muffin Pudding

Curry of Rabbits
Preserve of Olives

Soup
Haunch of Venison

Open Tart Syllabub
Raised Jelly

Three Sweetbreads, Larded

Maccaroni
Buttered Lobster

Peas
Potatoes

Basket of Pastry
Custards

Goose

Society meals were also being influenced at this time by the French chefs who had fled the revolution in their own country, and who had become a fashionable necessity in London.

Food in History gives this account of the dinner held by the Prince Regency at the Bright Pavilion, with his chef Carême in command on January 15, 1817:

“It began with four soups:

Le potage à la Monglas – creamy brown soup made with foie gras, truffles, mushrooms and Madeira

La garbure aux choux – country-style vegetable broth with shredded cabbage

Le potage d’orge perlé à la Cracy – a delicate pink puree of pearl barley and carrots

Le potage de poissons à la russe – ‘Russian-style’ fish soup, probably made from sturgeon

The soups were ‘removed’ with four fish dishes:

La matelote au vin de Bordeaux – a light stew of freshwater fish cooked in wine from Bordeaux

Les truites au blue à la provençal – lightly-cooked trout with a tomato and garlic sauce

Le turbot à l’anglaise aux homards, poached turbot with lobster sauce

La grosse anguille à la régence – a large fat eel, richly sauced, garnished with quenelles, truffles and cocks’ combs

The fish dishes were followed (the trout and turbot remaining on the table, the matelote and eels being taken away) by four grosses pieces or pieces de resistance:

Le jambon à la broche au Madére – spit-roasted ham with Maderia sauce

L’oie braiése aux racines glacées – braised goose with glazed root vegetables

Les poulards à la Perigueux – truffled roast chicken

Le rond de veau à la royale – round of veal, enrobed in a creamy sauce, finished with truffle purée and various garnishes

These grosses pieces (and the turbot and the trout) were flanked by no less than thirty-six entrée…”

Reay Tannahil, author of Food in History, gives a sampling of the various entrée, which includes macaroni and grated cheese, pheasant, rabbit, and other dishes, all with lush descriptions of rich sauces.  He adds that this was considered only the first course.

He also describes the set pieces brought in made of sugar icing and molded into such things as ‘The ruin of the Turkish mosque’, as well as the other entremets (between serving items) and the assiettes volantes, such as the five chocolate soufflé.

As stated earlier, while no one was expected to sample every dish on the table, the description makes it instantly understandable why the Prince Regent had run to fat.

The menus also reflect dishes familiar to any modern table–macaroni and cheese, trout with a tomato and garlic sauce, spit-roasted ham.

For a more simple family meal, Maria Rundell’s Domestic Cookery of 1814 gives this menu:

Crimp Cod

Salad
Gooseberry Pudding
Jerusalem Artichokes

Leg of Mutton

Crimp Cod is the simplest of recipes.  The directions are to take a cod and, “Boil, broil, or fry.”

For a salad, this is not what might be found in any modern American restaurant.  Instead, for Mrs. Rundell’s French Salad, “Chop three anchovies, a shalot, and some parsley, small; put into a bowl with two table-spoons-full of vinegar, one of oil, a little mustard, and salt.  When mixed well, add by degrees some cold roast or boiled meat in very thin slices; put in a few at a time; not exceeding two or three inches long.  Shake them in the seasoning, and then put more; cover the bowl close, and let the salad be prepared three hours before it is to be eaten.  Garnish with parsley and a few slices of the fat.”

Gooseberry pudding is a baked dish.  “Stew gooseberries in a jar over a hot hearth, or in a sauce pan of water till the will pulp.  Take a pint of the juice pressed through a coarse sieve, and beat it with three yolks and whites of eggs beaten and strained, one ounce and half of butter; sweeten it well, and put a crust around the dish.  A few crumbs of roll should be mixed with the above to give a little consistence, or four ounces of Naples biscuits.

(If you actually wish to try making this dish, you may want to start with gooseberry jelly, if you can find it.  For a ‘few crumbs of roll, think of this as something like a bath bun–a sweet roll.  Or for biscuit, think English cookie–something sweet to crumble into this.)

Jerusalem Artichokes offer another simple recipe in that they, “Must be taken up the moment they are done, or they will be too soft.  They may be boiled plain, or served with white fricassee sauce.”  Otherwise, prepare them as you would any artichoke, taking off a few outside leaves and cutting off the stalk (I also like to cut off the tips, but that’s optional).

For Leg of Mutton, Mrs. Rundell’s recommendation is, “If roasted, serve with onion or currant-jelly sauce; if boiled, with caper-sauce and vegetables.”  (Personally, I would swap in lamb for the mutton and opt for roasting it.  My grandmother who came from Yorkshire insisted on boiling all meat, and nearly made vegetarians out of all of her sons.)

And now I think I’ll go off and get something to eat.